Home made T-case lowering
I made this lowering kit after having installed the ProComp T-case lowering kit. The ProComp kit drops the T-case by 1.5". When dropping it this far it really binds the T-case shifting lever linkage and causes it to be hard to get into 2nd gear or Reverse. I found with this 1" drop it takes the binding off the linkage, no problem with getting into gears, and still alleviated the driveline vibration.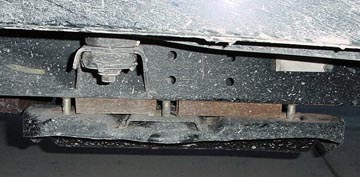
Steel tubes for t-case lowering prior to painting
Tools needed: Hacksaw or dremel tool w/cutting discs.
6 grade 8 steel bolts 1.75" longer than the stock t-case skid plate bolts. Remove one of the bolts to do this so you make sure you get the right threading and length. (purchase at Lowes Hardware)
6 one inch diameter washers that the bolts will go through. Recommend some of the hardened washers. (Purchase at Lowes)
Lowes Hardware store sells 1" steel square tubing in preset lengths. Buy one of these. I believe they are two feet long.
JB Weld
Can of paint primer and black paint (recommend enamel it's a little tougher)
Installation:
Cut 3 pieces of the tube 6.5" long and one at 4.75" long.
Primer and paint each one of these pieces inside and out. They rust up fast otherwise.
Place a jack under the skid plate and now loosen all the bolts. Once all the bolts are loose work on one side at a time. We''ll start with the passenger side. Remove all 3 bolts from one side. Now put washers on 3 of the bolts and start them back into the skid plate/frame. Place one 6.5" tube between the front two bolts and the 4.75" between the rear two bolts. Now start to tighten the bolts and close up the gap. Once the tubes start to make contact ensure that the tubes are between the grommets in the frame that the bolts go into. When you are sure of the placement, tighten down.
Repeat for the other side.
Once both sides are done, chip away some paint/primer at two corner points (skid and tube) where the tube contacts the skid. Take a small dab of JB Weld to each one of these spots. When cured do a quick primer/paint shot to cover it. The reason I do this is just for that extra bit of security and if I have to lower the t-case I don't have to realign them. If you ever need to remove the tubes just wack them with a hammer.
Field testing:
So far I have bashed the bottom of my skid plate and dented it with no damage to the tubing. I have also high centered (hard landing) with no damage to the tubes.
|